Stack Elevator - basement level: Physical world
As I posted recently I have been working on porting Cloud Foundry to the Raspberry Pi. Porting Cloud foundry took me on a journey through the whole stack. From physical level all the way up to the application and everything in between. In this blog series I’ll take you with me in the stack elevator and show some of each level I visited. First up is the basement level: Physical world
Raspberry Pi 2B
The most important part of the physical world is the actual compute board that we used. It happens to be a Raspberry Pi 2 model B. As you probably know there’s also a version 3 (3B+ even) which is a little bit faster and the 3B+ which also has faster networking. But I happened to have a Pi2b laying around and I could get a few more for a good price. What is most important for this story is that the Pi has an ARM CPU, not in Intel x86 compatible CPU. It is a Broadcom BCM2836 SoC with a 900 MHz 32-bit quad-core ARM Cortex-A7 processor to be precise. This means porting software to the Pi means either cross compiling it for ARM32v7 or compiling it on a Pi. Which is slow by the way…. very slow.
Network booting the PI
To be able to provision Raspberry Pis on-demand I needed to be able to network boot them. Turns out network boot is integrated in the raspberry Pi 3 firmware. But I had a Pi2 which did not support that feature. Luckily you can take the bootcode.bon from an rpi3 image, put it on an otherwise empty fat32 formatted sd card and then boot the Pi with the sd card inserted. Magic will happen and it will try to network boot :). Setting up network boot is pretty easy, here is a great tutorial on how to network boot a Pi3. I did follow that tutorial at first but quickly found out I needed a more advanced solution if I wanted to provision RPis on-demand. That solution will be discussed in the next article in this series.
PI Power Manager
Once I was able to boot the Pis from the network I needed a way to power them on and off programmatically. The Pis don’t have anything fancy like iLO or IPMI obviously so I had to find another way. The Pi 2 does have a reset pin exposed on the board so I could have hooked that up to a simple transistor and control it from another Pi or an MCU. But the reset pins are gone on the Pi 3 and I really wanted something that would be compatible with both version 2 and version 3 so I left the reset pins alone. The first working solution that I build used a relay board with and ESP8266 chip running a very simple web server. I used that to switch the relay remotely. The relay switched the mains power to a regular 5v usb power supply. I even enabled DDNS in the ESP8266 code so discovering the remote switch was very easy. However, I did not continue down the ESP relay board path for several reasons:
- Switching mains makes working with it less safe as opposed to switching 5v
- Wiring up a separate 5v mains power supply for each Pi would take up too much space and just result in a tangled mess of relay boards and mains wiring. That is, if I build it….. I’m sure someone will be able to build a neat enclosure that cover all the mess up
- ESP8266 only has wifi connection, no wired ethernet. I was not sure if putting a lot of ESPs close together would result in stable wifi connections. And what’s more important, I was aiming for a mobile demo setup. Which means that I would have to carry an access point with me all the times.
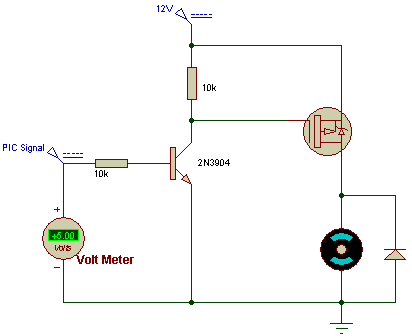
So I decided to bite the bullet and get myself an (overpriced imho) arduino ethernet shield. This gives me a wired connection to an arduino. which doesn’t need an OS and has virtually no boot-up time. Which is a quality I like for something as low level as managing power. The arduino controls a few power FETs which in turn switch the 5v from a beefy 30amp/5volt power supply. The power is fed into the Pis (Pii?) via the GPIO header. This is what the first prototype looked like:  Jep, that’s a mess but it worked. Recently I soldered all the components onto a perfboard and plugged it ontop of the arduino ethernet shield. Now it looks like this:
  Yeah…. still a mess. On first poweron one of the FETs got so hot it desoldered itself….. Good thing I don’t do electronics for a day job :). After some troubleshooting I got it to work and it seems reliable. If you’re interested in building your own, this is basically the schematic I used. I replicated it for each Pi I want to control and I added a big cap to the 5v rail to absorb the power peak when a Pi is turned on. The source code for the arduino is in the PPI repository. Is this solution ideal? Not really. A better scenario would be using Power over Ethernet with a switch that has an API and is capable of switching the power per individual port. The recently released Pi 3B+ has build in wiring and headers for PoE support. So the PoE HAT that will be released for the 3B+ will just be converting 48V down to 5V while using the onboard RJ45 connector. So hopefully that package will fit into existing enclosures like the cool like boxes I use. When the Pi3B+ PoE HAT is available I’ll be definitely looking at upgrading to a PoE switch and getting a few brand new Raspberries.